
How to Install an Automatic Gate Opener in Austin, TX
Thinking about how to install an automatic gate opener in Austin, TX? You’re in the right place. This guide walks you through everything — from picking the right opener to getting it running properly. And if you’d rather have a pro handle it, our automatic gate repair and installation team in Austin, TX, is just a call away.
Types of Automatic Gate Openers You Should Know About
Every property is different, and so is every gate opener. Before you figure out how to install an automatic gate opener, what works for your neighbour might not work for you — it really comes down to your gate style, how much space you’re working with, your power situation, and what you’re willing to spend.
1. Swing Gate Openers
If you have a swing gate — one that opens inward or outward like a door — you’ll need a swing gate opener. Installing an automatic swing gate opener differs slightly from installing other types, as the actuator arm is mounted on the gate post and operates by pushing or pulling the gate open. These are common in residential driveways across Austin, TX and work well for single and dual-swing gates.
2. Sliding Gate Openers
Sliding gates move sideways along a track. They’re great for places where swing gates don’t have enough space to open. The opener motor mounts beside the gate and drives a rack gear along the bottom. If your Austin, TX, property has a long driveway or a commercial entry, sliding gate openers are often the better choice.
3. Solar Gate Openers
If your gate is far from a power source — at the end of a long driveway or on a rural property — Being aware of how to install a solar gate opener yourself can save you a lot of money on digging and electrical work.
The setup is pretty straightforward — a solar panel charges a battery, and that battery powers the motor. And honestly, if you’re in Austin, TX, you’re in a good spot for this. We get plenty of sun here, so these systems barely skip a beat even through the seasons.
4. Underground Gate Openers
These are hidden beneath the ground and connect directly to the gate post. They’re sleek, nearly invisible, and ideal for high-end properties. Installation is more complicated and is typically recommended to be handled by qualified professionals.
What You Need Before You Start
Get everything together before you start learning how to install an automatic gate opener — trust me, stopping mid-install to run to the hardware store is more annoying than it sounds. Here’s what you’ll need:
- gate opener kit (motor, arms, control board, remotes)
- Mounting hardware (bolts, brackets, posts)
- Concrete or post anchors (if needed)
- Drill and drill bits
- Level
- Wire stripper and electrical wire
- Voltage tester
- Safety glasses and gloves
If you are installing a solar gate opener, you will also need a solar panel, a mounting bracket, and a compatible battery. Before anything else, take a good look at your gate. If it’s sagging, dragging, or the hinges are damaged, fix that first — because no opener is going to perform well on a gate that’s already struggling. Our team provides professional gate repair services in Austin, TX, to ensure everything operates smoothly from the start.

Step-by-Step: How to Install an Automatic Gate Opener
Now let’s get into the actual process. This guide covers the general steps for how to install an automatic gate opener on a swing gate — the most common residential setup in Austin, TX.
Step 1 — Read the Manual First
Every gate opener kit is different. Before you touch a single bolt, read the manufacturer’s manual cover to cover. It will tell you the exact measurements, wiring diagrams, and safety requirements for your specific model.
Step 2 — Check Your Gate’s Condition and Alignment
Your gate needs to swing freely without resistance. Check the hinges, make sure the gate is level, and confirm it doesn’t drag on the ground. A motor can’t compensate for a poorly hung gate — it’ll burn out faster than expected.
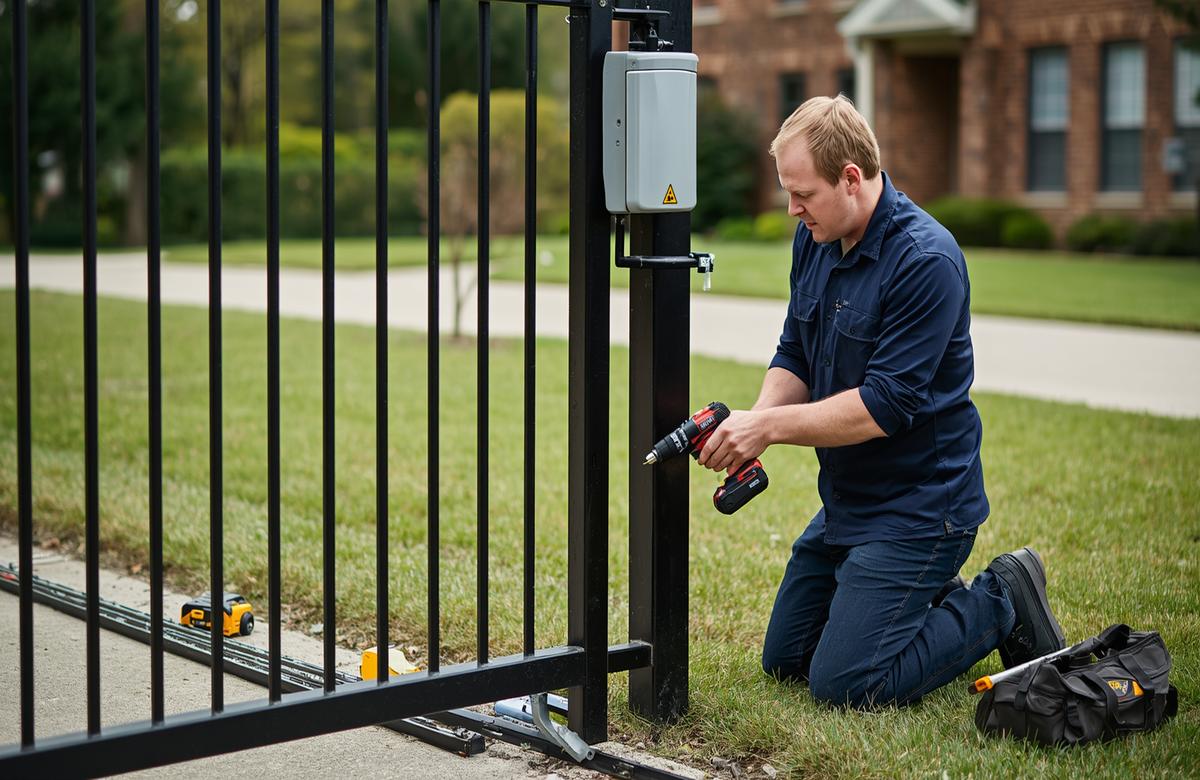
Step 3 — Mark and Mount the Motor Bracket
The motor bracket attaches to the gate post or pillar. Use your level to make sure it’s perfectly straight. This is one of the most critical steps when figuring out how to install an automatic gate opener — if the bracket is off, the arm won’t line up correctly, and the gate may not open fully.
Drill your holes, insert anchors if needed, and bolt the bracket firmly in place.
Step 4 — Attach the Arm to the Gate
The actuator arm connects the motor to the gate. One end attaches to the motor, the other to a bracket welded or bolted onto the gate itself. The arm should be mounted so it pushes or pulls the gate at the correct angle — your manual will show the exact geometry required.
Step 5 — Mount the Motor Unit
Slide or bolt the motor unit onto the bracket you installed in Step 3. Make sure it’s secure and positioned correctly relative to the arm you’ve already attached.
Step 6 — Run the Wiring
This is where many DIY automatic swing gate opener projects hit a delay. You need to run low-voltage wire from the motor to the control box, and from there to your power source, keypad, intercom, or safety sensors.
Keep wiring neat, use conduit where the wire is exposed, and make sure all connections are weatherproof. Austin’s weather — from summer heat to spring storms — is tough on exposed wiring.
Step 7 — Install Safety Sensors
Safety sensors (photo eyes) detect if something is in the gate’s path and stop or reverse it automatically. These are not optional — they protect children, pets, and vehicles from being struck. Mount them low on each side of the gate opening, facing each other.
Step 8 — Connect to Power
If you are using a standard electric opener, connect the control board to a grounded outlet or a hardwired power source. For a solar gate opener, install the solar panel at the proper angle (south-facing is typically ideal in Austin, TX), connect it to the battery, and then wire the battery to the control board.
Step 9 — Program the Remotes and Keypads
Follow the manufacturer’s instructions to sync your remotes and any keypads or intercoms. Test each one multiple times from different distances.
Step 10 — Test Everything Thoroughly
Open and close the gate at least 10 times. Check for the smooth movement, proper stopping points, and correct sensor behaviour. Place an object in the gate’s path and verify the safety sensors stop it immediately.
Adjust the open and close limits on the control board until the gate consistently stops at the correct position.
Common Mistakes to Avoid When Installing an Automatic Gate Opener
Look, even users who’ve done this before mess things up sometimes. So before you get too far in, here are the mistakes Austin, TX homeowners usually make when installing an automatic gate opener:
Skipping gate inspection: Installing a motor on a damaged or misaligned gate is asking for trouble. Always fix the gate first.
Wrong opener for the gate type: A swing gate opener won’t work on a sliding gate. Match the opener to your gate style.
Undersizing the motor: If your gate is heavy — iron or steel — you need a motor rated for that weight. An undersized motor will burn out quickly.
Poor wiring: Loose connections, unprotected wire runs, and incorrect gauge wire cause most gate opener failures within the first year.
Ignoring safety sensors: Skipping sensors might save time upfront, but creates serious liability. Always install them.
Not accounting for power outages: Many gate openers have battery backup; if yours doesn’t, look into a manual release so you’re not locked in during an outage.
DIY vs. Professional Opener Installation — Which Makes More Sense?
Plenty of Austin, TX, homeowners successfully handle a DIY automatic swing gate opener installed on simple setups. But there are situations where calling a professional is the smarter move:
- Your gate is heavy (over 300 lbs)
- You need electrical work done (hardwired connection)
- You’re installing an underground opener
- Your property has complex access control needs (intercoms, cameras, keypads)
- You’ve attempted the install, and something isn’t working correctly
Professional installation ensures the job is done right the first time — with proper wiring, correct programming, and a warranty on the work. Our automatic gate installation team in Austin, TX, handles everything from simple residential setups to full commercial access systems.
Maintaining Your Automatic Gate Opener After Installation
Knowing how to install an automatic gate opener is just the beginning — long-term performance comes down to regular maintenance.
Every 3 months:
- Lubricate the hinges, rollers, and the actuator arm
- Check sensor alignment
- Test the battery backup
Every 6 months:
- Inspect all wiring for signs of wear or damage
- Clean the solar panel (if applicable)
- Check mounting hardware for tightness
Annually:
- Have a professional inspect the motor and control board
- Test the full system under load
Our gate maintenance services in Austin, TX, keep your gate opener running smoothly year after year — so you’re never stuck with a gate that won’t open when you need it most.
The global automatic gate opener market is projected to grow significantly over the coming years, driven by rising demand for home security and smart access systems.
Source: Grand View Research
Final Thoughts
Learning how to install an automatic gate opener takes patience, the right tools, and careful attention to detail. Whether you go with a swing opener, sliding system, or solar gate opener, the process always comes down to the same core steps — proper mounting, clean wiring, correct setup, and thorough testing.
Austin, TX homeowners who put in the effort to get the installation right enjoy years of reliable, low-maintenance access control. And when something does go wrong — or when you’d prefer a professional handle it from the start — Austin Gate Repair is here. We’ve helped hundreds of Austin, TX, property owners get their gates running perfectly, and we’d love to help you, too.
Call us at (512) 957-4708 or visit our website to schedule your free on-site estimate today.
Frequently Asked Questions
Can you install an automatic gate yourself?
Yes, you can install an automatic gate opener yourself if you’ve got some basic electrical and mechanical know-how. But it’s not always as simple as it looks. You’ll be dealing with wiring, proper alignment, and safety settings that all need to be done carefully. That’s why a lot of homeowners choose professional installation instead — it helps avoid mistakes and keeps the system running smoothly for years.
Do I need a permit for an automatic gate?
Honestly, this is something a lot of people skip and then regret later. Depending on where your property sits in the Austin’s area, you may need a permit — especially if there’s electrical work involved. Just make a quick call to your local city or county office and ask — seriously, it takes five minutes. Better than finding out halfway through the job that you needed a permit, and now you’ve got a problem on your hands.
Do you put hinges on the gate or the post first?
Typically, hinges are first installed on the gate post. Once the hinges are solid and sitting right, go ahead and hang the gate. Take your time getting the alignment correct here — if the gate isn’t sitting right, it puts extra strain on the opener motor and things start going wrong pretty quickly.
What are the common problems with automatic gate openers?
Honestly, most gate opener issues aren’t mysterious. Nine times out of ten, it’s a dead remote battery, a sensor that got bumped, or a motor that’s been bone-dry for months. If you knew how to install an automatic gate opener correctly from the start, a lot of these problems wouldn’t even show up. Throw in Austin’s heat and humidity, and things wear out even faster. Keep up with basic maintenance, and honestly, you’ll dodge most of these problems before they even start.